
This chapter provides a comprehensive overview of the key elements of the mDSS homepage. It also offers guidance on selecting the most suitable type of Multi-Criteria Analysis (MCA) based on user needs, introduces the case study used throughout the User Guide, and presents a step-by-step guide for starting a project from scratch in mDSS.
The Main Elements
The first window that appears to the user is the mDSS homepage. This corresponds to the Introduction phase of the Tab Bar. The other phases of an mDSS session include Concept, Design, Choice, and Group Decision. Users can navigate between these phases by selecting the desired option from the Tab Bar.
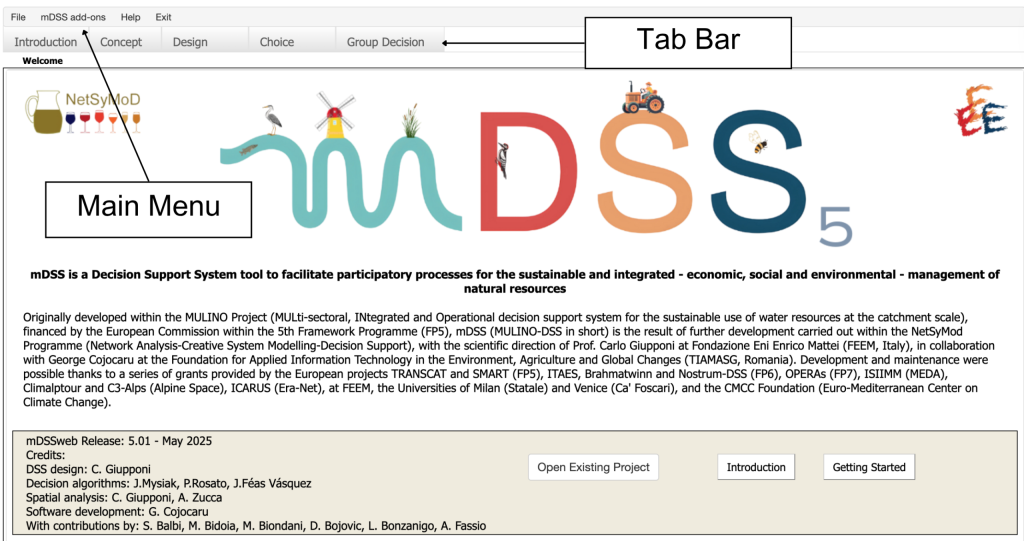
Above the Tab Bar is the Main Menu, which is accessible in all five phases. The Main Menu consists of four components:
- File
- mDSS Add-ons
- Help
- Exit
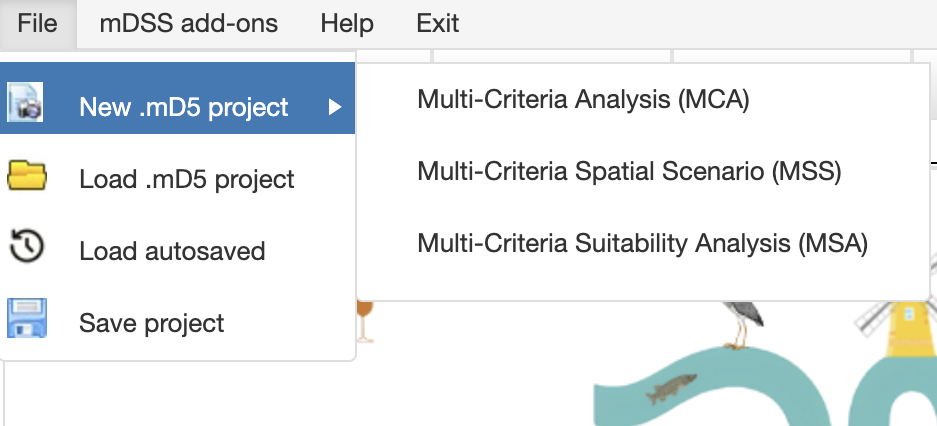
The File option allows users to start a new project or open and save existing ones (Figure 3). The mDSS Add-ons provide access to additional features for Uncertainty Analysis, including the creation and execution of batch files. The Help button allows users to access the User Manual and the Methods Handbook quickly.
Users can save the current project at any time as a .mD5 file by clicking File → Save project. It is advisable to save progress frequently to prevent any unintended loss of work. Users can choose to load a previously saved project instead of starting a new one by clicking the Open Existing Project button in the lower-right corner of the interface or selecting File → Load .mD5 project (see Figure 3).
In the context of SOS and MOS, beyond the .mD5 file, mDSS also download supplementary .zip files during the saving process, which are essential for future uploads using the “Load .mD5 Project” function. For instance, when saving a MOS project, mDSS generates a .mD5 file along with a .zip file containing data related to the Evaluation Matrix (see the “Choice” chapter). If the user wishes to reload a previously saved .mD5 project, they must upload the following files:
- The .mD5 file
- The original .dbf, .shp and .shx files (see the next section)
- The Evaluation Matrix (.zip file)
This ensures that the project can be fully restored, allowing work to resume seamlessly. In general, mDSS provides clear guidance on where and when to upload the required supplementary files when needed. The user should simply ensure they download and store all the generated files during the saving process.
The “Load Autosaved” button allows users to quickly reload their latest work without reconfiguring settings, thanks to a server-side auto-save that occurs 5 minutes after starting the project. These autosaved files include all project components but are temporary and automatically deleted after 24 hours. Be sure to manually save important work if needed.
Multi-Criteria Analysis (MCA): Choosing the Type
When starting a new .mD5 project, users must select the type of Multi-Criteria Analysis (MCA) that best suits their needs. mDSS provides three options, and the choice should align with the specific objectives of the analysis. The available methods in mDSS are:
- Multi-Criteria Analysis (MCA)
- Multi-Criteria Spatial Scenario (MSS)
- Multi-Criteria Suitability Analysis (MSA)
1. Multi-Criteria Analysis (MCA)
This option is ideal for scenarios where spatial functionalities are not required. It helps users evaluate and choose between alternatives based solely on their criteria performance without considering spatial factors.
2. Multi-Criteria Spatial Scenario (MSS)
The MSS option is specifically designed to generate a single global ranking of options by combining multiple spatial object rankings with weighted factors. For example, a policymaker could use this feature to create a comprehensive national ranking of energy development options, integrating results from all twenty Italian regions. This is achieved by aggregating regional scores and applying weightings based on variables such as area size or population. Additionally, the process enables the generation of distinct local rankings for each of Italy’s twenty regions—such as one for Veneto, another for Lombardia, and so forth.
This option is particularly useful for:
- Determining a single policy to apply across all spatial objects, using weighted performances (e.g., based on area size or population) to identify the most effective overarching strategy.
- Selecting the best policy for individual spatial objects, enabling tailored solutions for specific regions or areas based on their unique performance across multiple criteria.
To start a MSS project, users must upload the following files:
- A .dbf file containing attribute data.
- A .shp (shape file)
- A .shx (index file)
3. Multi-Criteria Suitability Analysis (MSA)
The MSA option allows users to rank spatial objects, such as geographic regions, to identify the most suitable locations for a specific project. For example, suppose a biodiversity restoration project requires identifying the three most suitable Italian regions for implementation. In that case, the MSA tool can generate a ranked list of spatial objects tailored to this need, placing the most suitable regions at the top of the ranking.
To start an SOS project, users must upload the following files:
- A .dbf file containing attribute data.
- Optionally, a .shp (shape file) and a shx (index file) to utilize the spatial functions.
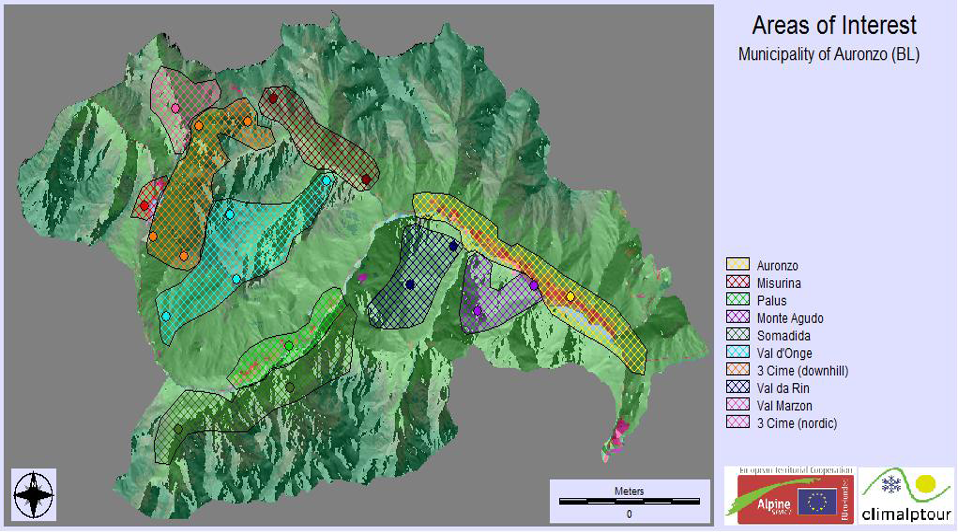
The Case Study: Auronzo di Cadore
To provide a clearer understanding of the software’s functionalities and its field of application, this section introduces a real-world case study from the ClimAlp Tour project. This example is consistently referenced throughout the subsequent chapters of the user guide to help users grasp the concepts more effectively. It is applied to each of the method options: MCA, MSS, and MSA.
Auronzo di Cadore, a picturesque town nestled in the Veneto region of northern Italy within the province of Belluno, is located in the heart of the Dolomites, a UNESCO World Heritage Site. Renowned for its breathtaking natural beauty, vibrant alpine culture, and diverse outdoor activities, the town attracts visitors from around the world.

Suppose stakeholders in this area—such as policymakers, citizens, environmental associations, and entrepreneurs—wish to implement a project with two main objectives:
- Enhancing the resort’s potential as a tourist destination to boost its attractiveness.
- Raising awareness among stakeholders about the need for climate change adaptation strategies.
To determine the preferred option for implementation from the perspective of each stakeholder group, the mDSS can be utilized. This tool enables a structured approach to decision-making, balancing the diverse interests and priorities of all involved parties.
The town is very well known as a summer holiday retreat but is less recognized as a winter destination. Its relatively low altitudes make it more vulnerable to the impacts of climate change, which could further challenge its appeal during the colder months. Additionally, the town faces stiff competition from neighbouring resorts that boast highly advanced and established facilities for traditional winter sports. Alternative development strategies can be evaluated using a comprehensive framework based on social, environmental, and economic indicators. This approach ensures a balanced assessment of each option’s potential impact and feasibility.
Starting from Scratch
This section outlines the key steps a user must follow to successfully start a project from scratch in mDSS and proceed to the Concept phase.
1. Multi-Criteria Analysis (MCA)
To begin a new scalar analysis from the mDSS homepage, as outlined in the Introduction, the user must click on File -> New .mD5 Project -> Multi-Criteria Analysis (MCA). The software then directs the user to the “Conceptual” phase of the mDSS session, opening an empty DPSIR window as shown in Figure 7.
2. Multi-Criteria Spatial Scenario (MSS)
To begin a new MOS analysis from the mDSS homepage, the user must click on File -> New .mD5 Project -> Multi-Criteria Spatial Scenario (MSS). To proceed with the Concept Phase and access the DPSIR window, mDSS requires the user to upload three files:
- A .dbf file containing attribute data.
- A .shp (shape file)
- A .shx (index file)
An example of a .dbf file is shown in Figure 6, which refers to the case study of Auronzo di Cadore. This file format is used to store attribute data in a tabular form and is commonly paired with shapefiles (.shp) and index files (.shx) in geographic information systems (GIS). Together, these files contain information about geographic features, such as locations, types, and other attributes, all linked to specific spatial coordinates.
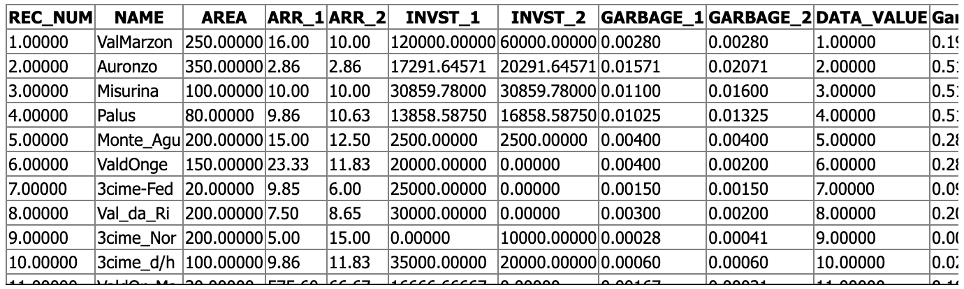
In the context of mDSS, a .dbf file should include the following elements:
- Geographical Identifier. A column that uniquely identifies the geographical units, such as REC_NUM (a numerical ID) or NAME (the name of the unit), ensuring clear and distinct reference for each spatial object.
- Spatial Characteristics. Columns provide key characteristics of the geographical unit, which can aid in the weighting process during analysis. For instance, Population and Area (denoted as AREA) are useful for considering the size and demographic features of the unit.
- Indicator Values for Different Scenarios. Grouped columns that contain the values of different indicators for each option or scenario being analysed. For example, columns such as INVST_1 and INVST_2 represent the values of the “Investment costs” indicator under two distinct scenario options (responses). This enables comparison and further evaluation of alternative outcomes.
By organizing the .dbf file in this way, the data can support a thorough analysis and facilitate the subsequent stages of the mDSS process, such as weighting and decision-making.
Once the three files are selected, mDSS guides the user to the Concept Phase, displaying the initial empty DPSIR window, similar to the one shown in Figure 7.
The key difference between the steps in the Multi-Criteria Analysis (MCA) case and the Multi-Criteria Spatial Scenario (MSS) approach (as well as the MSA approach) lies in the preparation required before initiating the mDSS session. For MSS, users must first define and prepare the indicators and options. This includes selecting the relevant indicators, specifying the options to be analysed, and assigning values to the indicators. This preparatory work is essential to ensure that all necessary data is available and properly structured for the system input. In contrast, in the Scalar context, users can define the indicators during the Concept Phase and assign values to them only during the Design Phase.
For MSS (and MSA), the selection of indicators, options, and values must be completed before the mDSS session begins. Importantly, mDSS does not require that all uploaded indicator columns be used in the quantitative analysis. It only requires that the relevant indicators intended for analysis be uploaded according to the specified procedure. For example, a user may upload in the .dbf file indicator columns for Biodiversity such as BIODIV_1 and BIODIV_2, but choose not to include them in the subsequent quantitative analysis.
3. Multi-Criteria Suitability Analysis (MSA)
To begin a new MSA analysis from the mDSS homepage, the user must click on File -> New .mD5 Project -> Multi-Criteria Suitability Analysis (MSA). To proceed with the Concept Phase and access the DPSIR window, mDSS requires the user to upload three files:
- A .dbf file containing attribute data.
- A .shp (shape file)
- A .shx (index file)
The user can also choose to upload only the .dbf file, but this choice will result in the loss of the spatial dimension of the analysis. For example, in this case, the user would lose the ability to visualize the spatial distribution of the analysis scores. Notably, mDSS supports a maximum dimension for the .dbf file of 10,000 cells. This translates to a maximum of 1,000 spatial objects and 100 columns (which can include indicators, unique codes, information, etc.), or other similar combinations.
After uploading the required file(s), mDSS displays the standard Indicator Window. The user should refer to the next chapter for instructions on how to proceed.